
Your bot just went down and you are on your phone. Instead of opening the panel, finding the deployment, opening the console and scrolling through the logs, you type one sentence into ChatGPT: “why did my bot crash and can you restart it?”
That is what the Bot-Hosting MCP server does. It exposes your account to any MCP-compatible AI assistant, so ChatGPT can list, inspect and control your deployments through the exact same permissions, scopes and rate limits as our REST API.
This guide walks through connecting it to ChatGPT with OAuth, step by step, with screenshots.
What is MCP, and why should you care?
MCP (Model Context Protocol) is the open standard for giving an AI assistant real tools instead of a text box. Rather than pasting logs into a chat and hoping for a useful answer, the assistant reads them itself, then acts.
The Bot-Hosting MCP server publishes more than 70 tools, one per API operation, grouped in four families:
| Family | What the AI can do |
|---|---|
| Deployments | Create, list, inspect, start, stop, restart, resize, read and search logs, run console commands, diagnose a crash |
| Files & env | Browse, search, read, edit, write, move, upload, compress, restore an earlier version, read and set environment variables |
| Backups, packages & projects | Create and restore backups, add and remove packages, group deployments into projects |
| Account, templates & docs | Read your plan, quota and credits, browse the public template catalogue, search the documentation |
Every single call runs through the same guard as the REST API. There is no shadow permission model: if your credential is not allowed to delete a deployment, neither is the AI.
Some things people actually use it for:
- “Restart my music bot” without opening a browser tab
- “Read the last 100 log lines and tell me what the error means”
- “Set the
NODE_ENVvariable to production on my main bot” - “Which of my deployments is using the most RAM right now?”
- “Create a new Node.js 24 deployment from my GitHub repo”
Works with Claude and Grok too
The screenshots below are ChatGPT’s, but almost nothing in this guide is specific to it. We tested the same endpoint on ChatGPT, Claude and Grok, and all three connect the same way: find the custom connector or MCP server section in the settings, paste https://bot-hosting.net/api/mcp, choose OAuth, sign in, approve the scopes. Only the menu names change from one app to the next (ChatGPT calls them Plugins, Claude calls them Connectors).
Any other MCP-compatible client should work just as well, we simply have not verified them ourselves.
Before you start
You need two things:
- A Bot-Hosting.net account with at least one deployment.
- A ChatGPT account. Custom MCP servers live under Settings > Plugins (they were previously called connectors). They were taken on a free account, so no ChatGPT subscription is required to follow along.
The endpoint you will be pasting is:
https://bot-hosting.net/api/mcpKeep that URL handy, it is the only piece of configuration you need. Authentication is handled by OAuth, so there is no API key to copy or store anywhere.
Step 1: open your ChatGPT settings
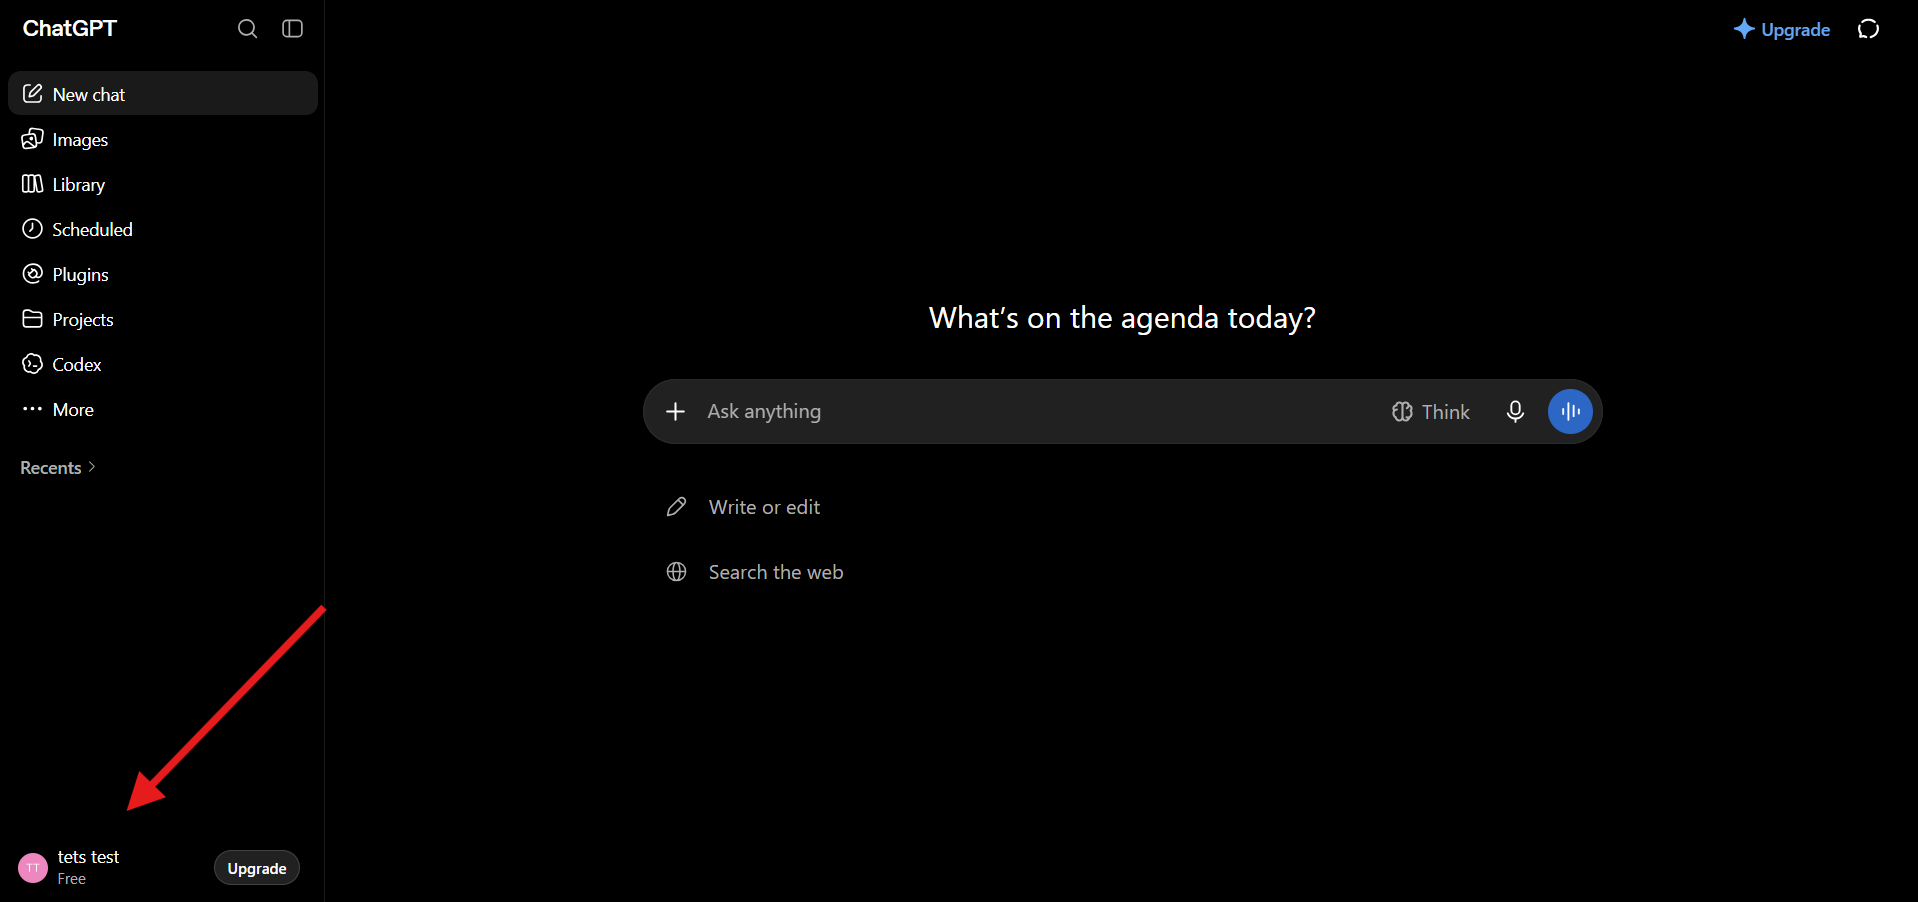
Click your account name at the bottom left of the sidebar, then open Settings.
Step 2: go to the Plugins section
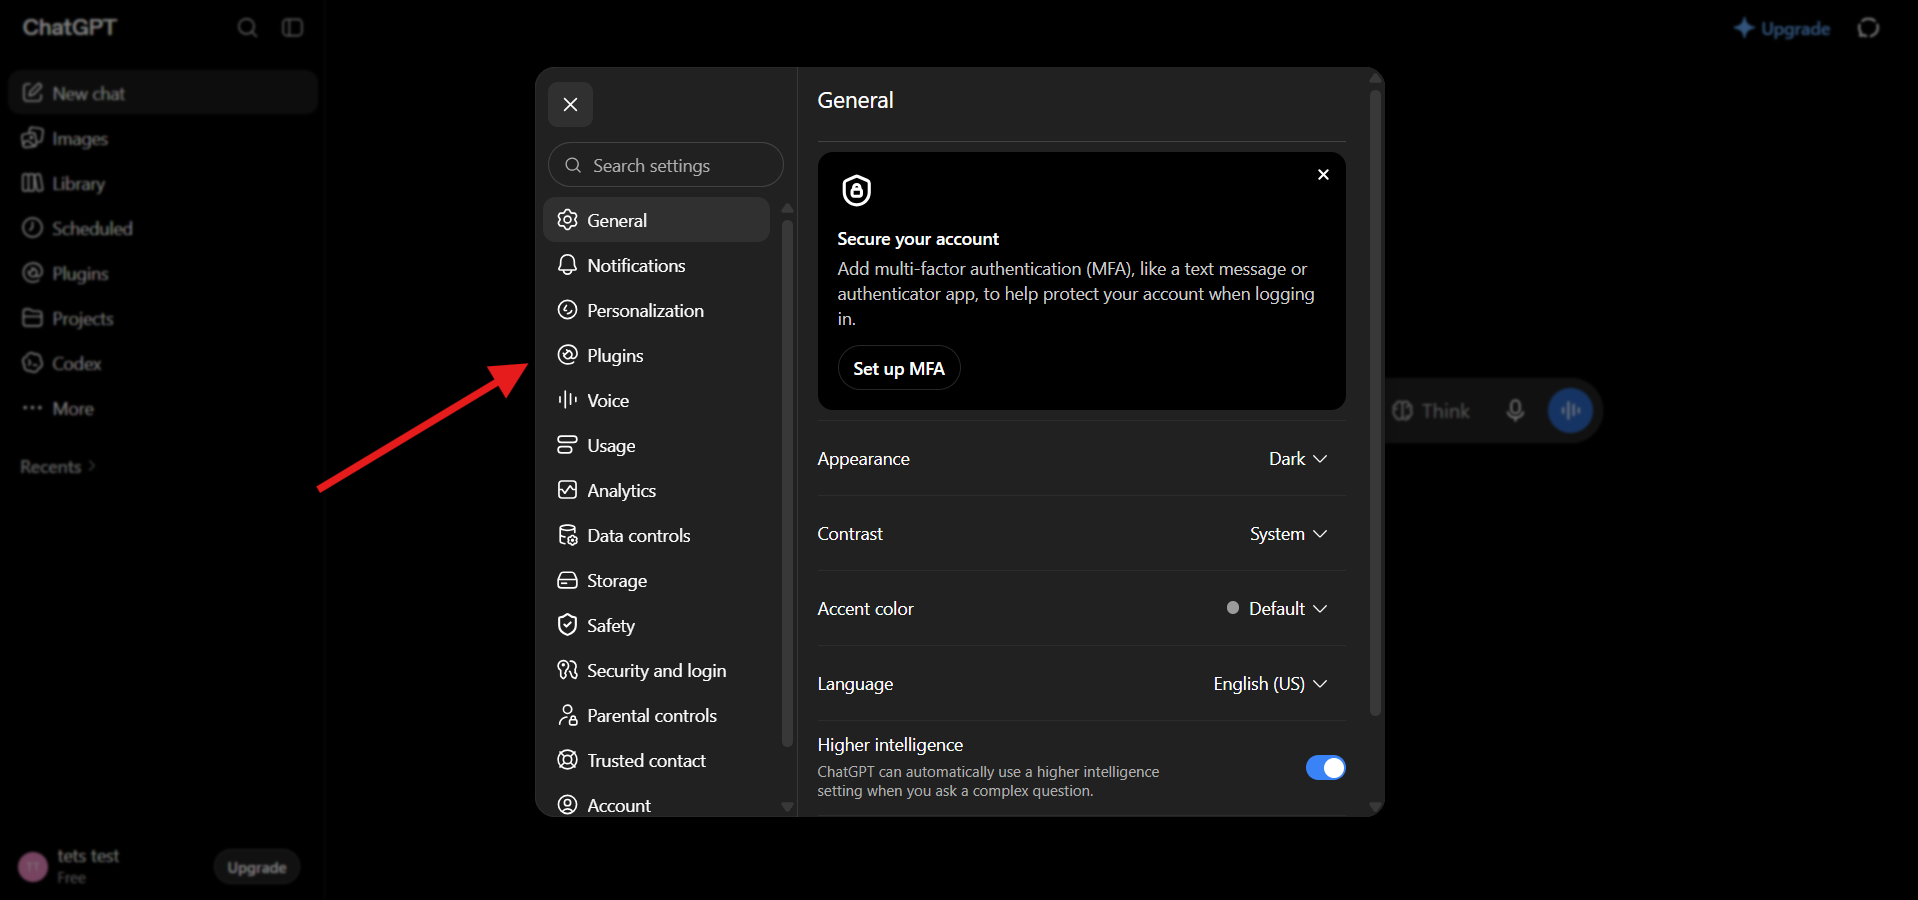
In the settings dialog, select Plugins in the left column.
Step 3: open Plugin Management
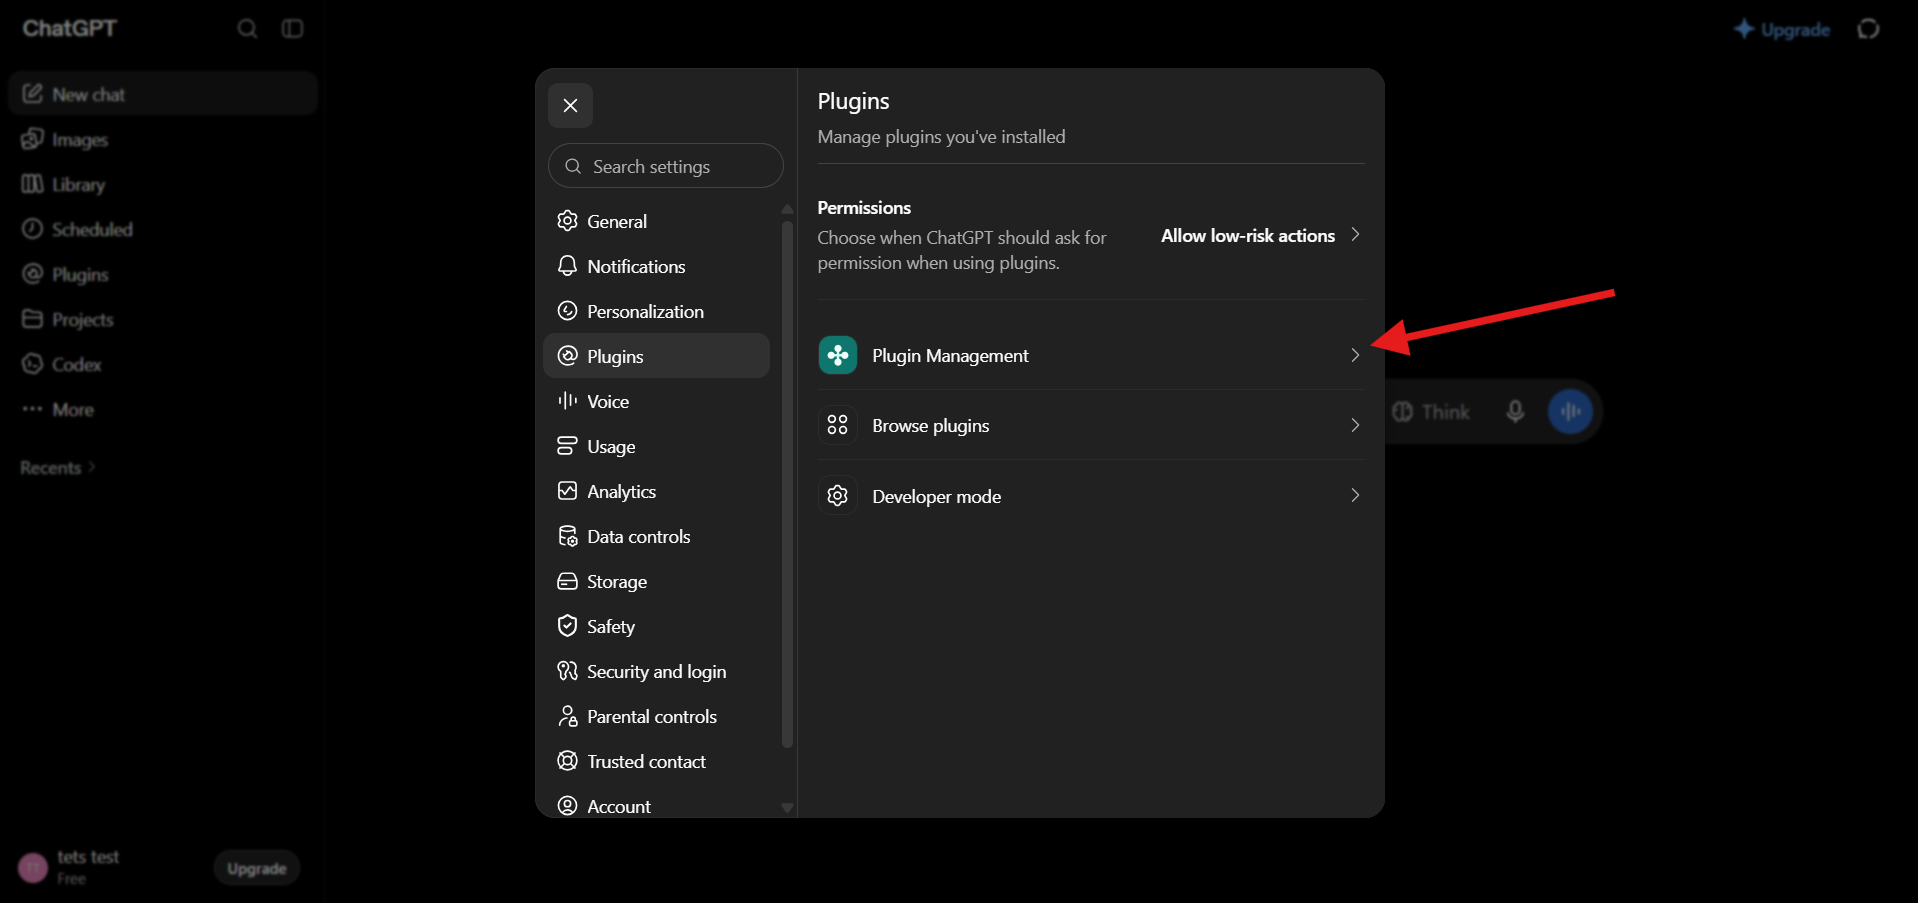
The Plugins pane has three entries. Click Plugin Management to reach the full plugin directory, where custom servers are added.
Step 4: add a custom plugin
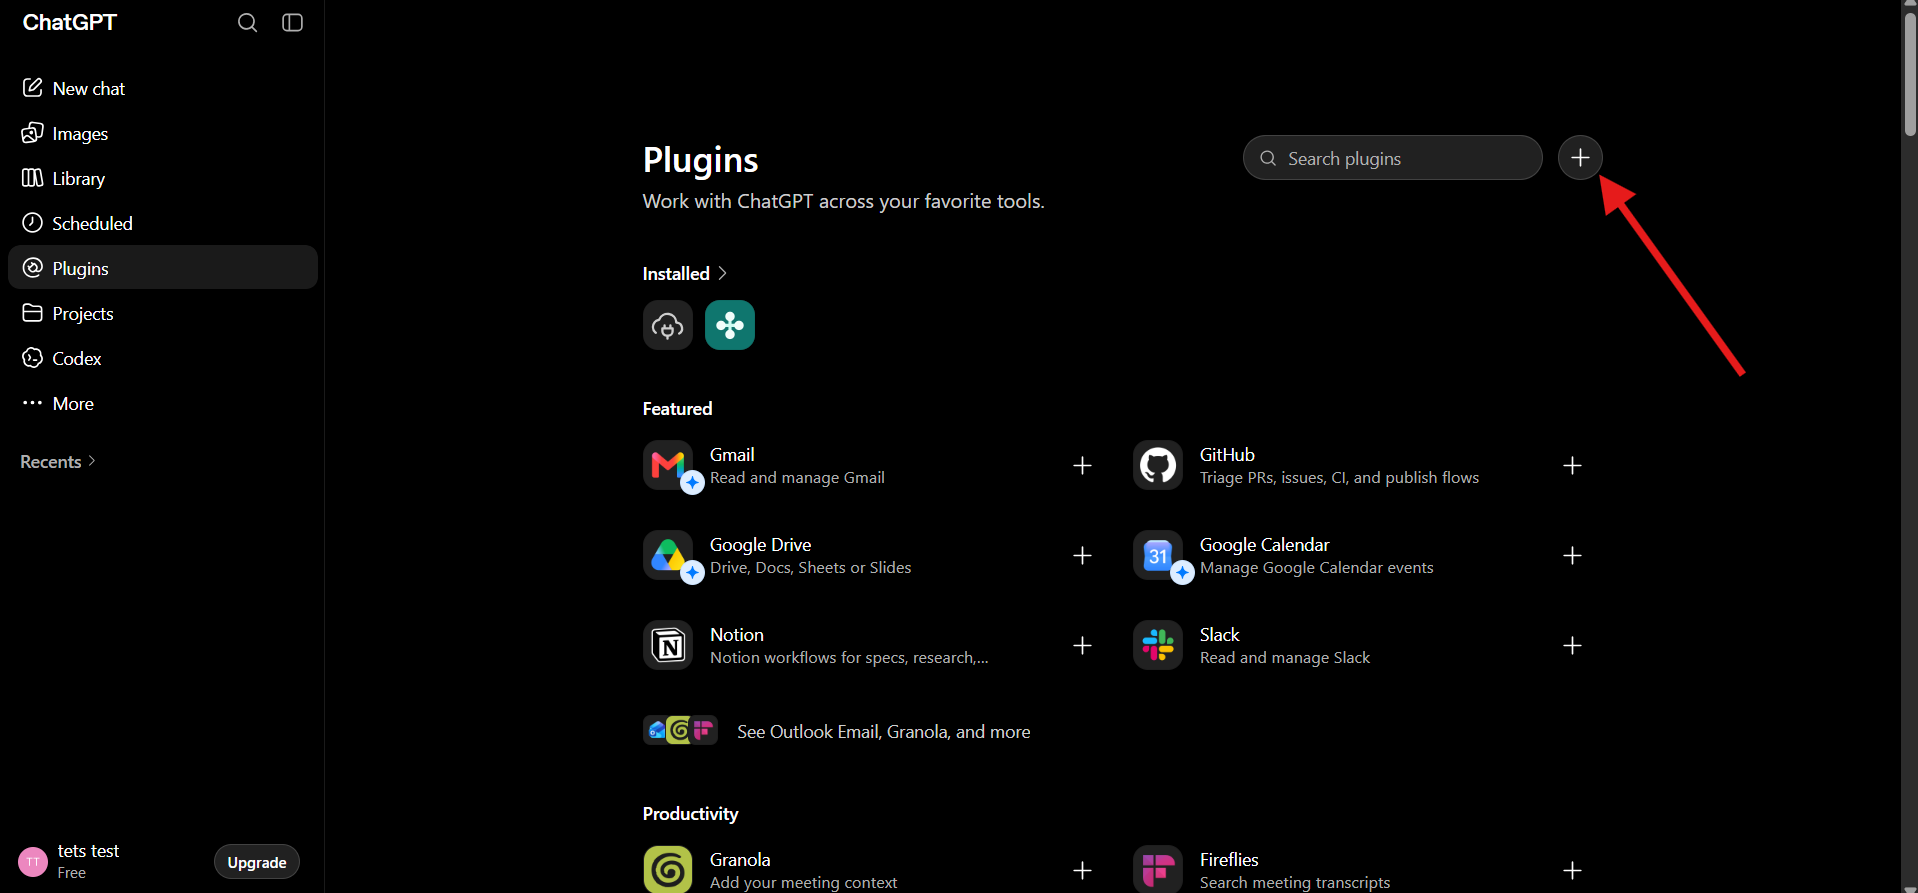
On the Plugins page, click the + button at the top right, next to the search field.
Step 5: fill in the Bot-Hosting MCP endpoint
The New Plugin dialog asks for four things:
- Name: anything you like, for example
bot-hosting AI. This is the name you will see in the tool picker. - Connection: keep Server URL selected (not Tunnel).
- URL:
https://bot-hosting.net/api/mcp - Authentication: choose OAuth. Dynamic Client Registration is auto-detected, so you do not need to create an app or paste a client ID. If you open Advanced OAuth settings, you should see the authorization and token endpoints already discovered.
Tick the I understand and want to continue box, then click Create.
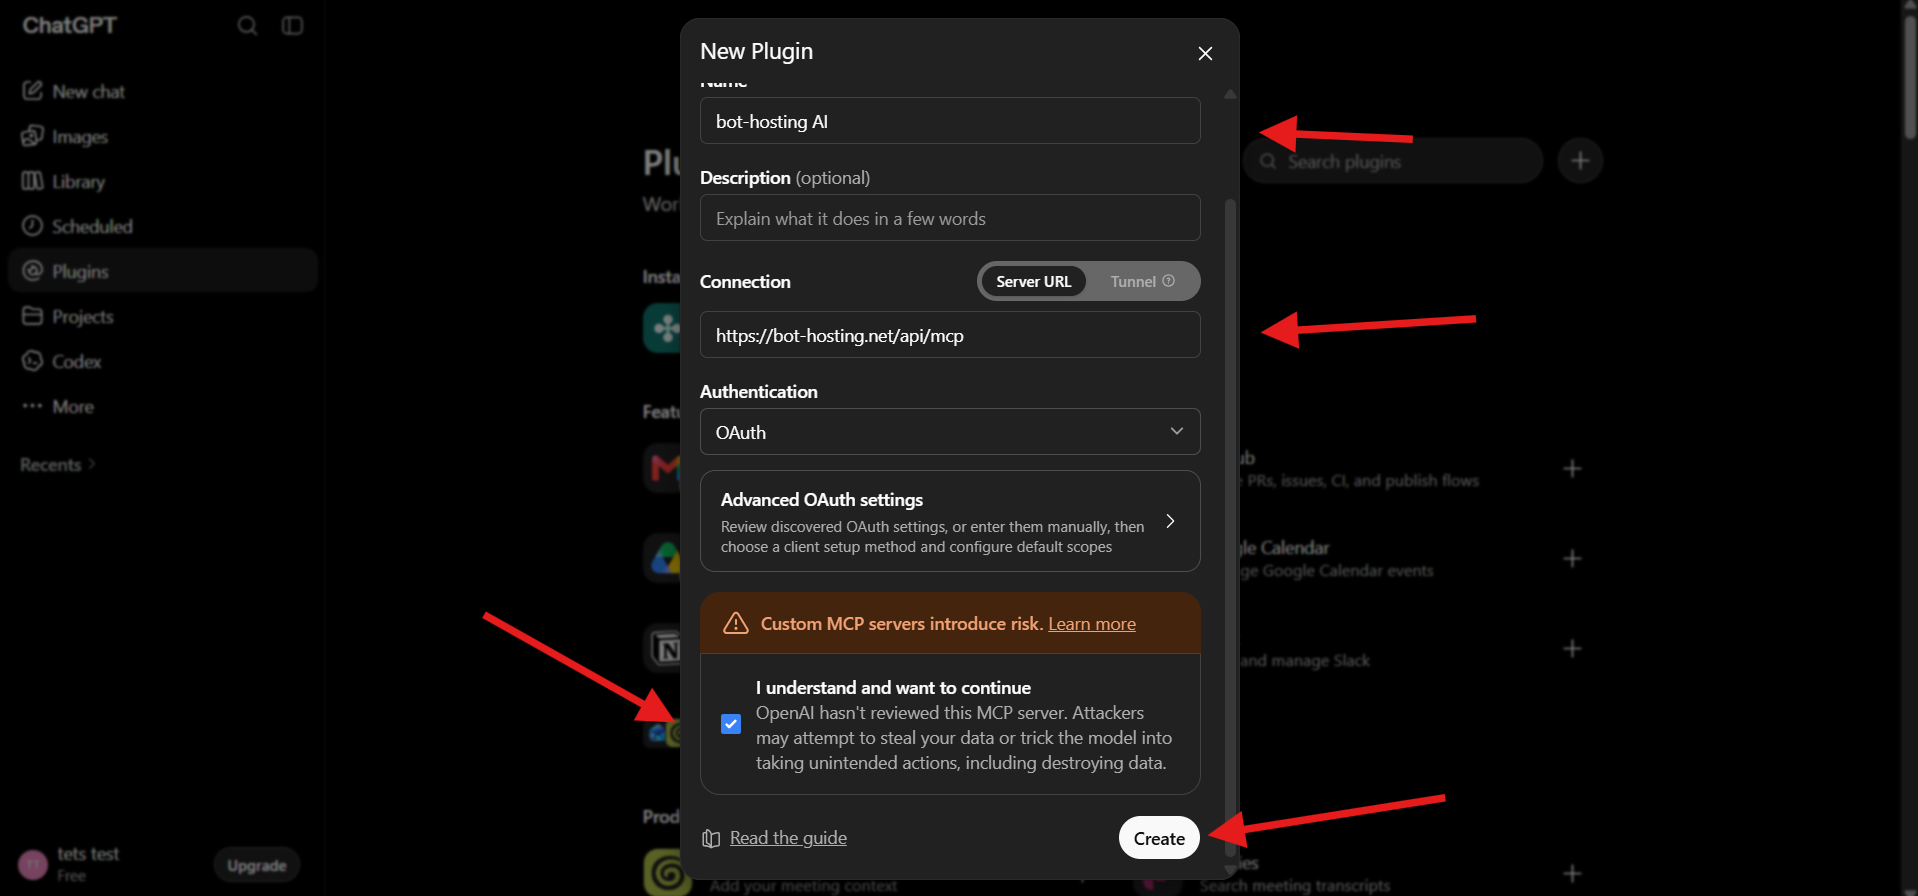
The warning about custom MCP servers is generic: OpenAI shows it for every server it has not reviewed itself. It is worth reading, because it applies to any third-party MCP server you add, not just this one.
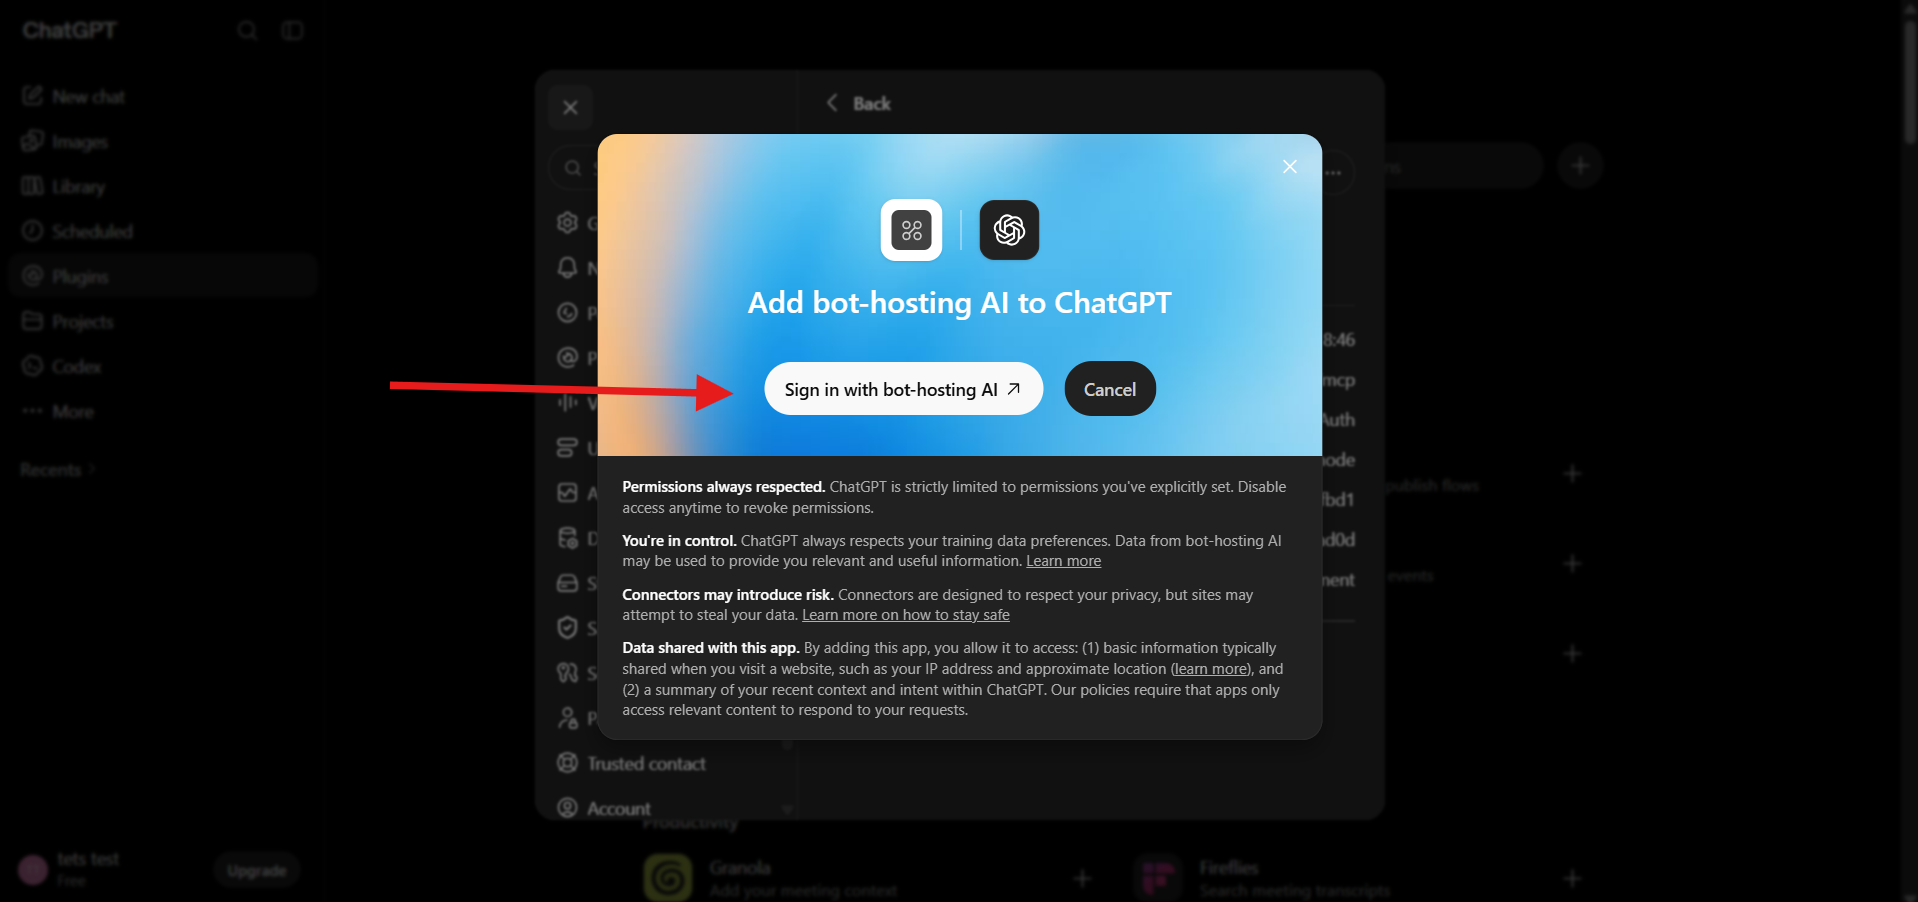
Step 6: sign in with Bot-Hosting
ChatGPT now hands off to us. Click Sign in with bot-hosting AI and a Bot-Hosting login window opens.
Step 7: approve the scopes
This is the important screen. Bot-Hosting shows you exactly what ChatGPT is asking for, scope by scope, grouped by family: deployments, projects, files, environment variables, backups, packages, then account.
Read the list, then click Authorize.
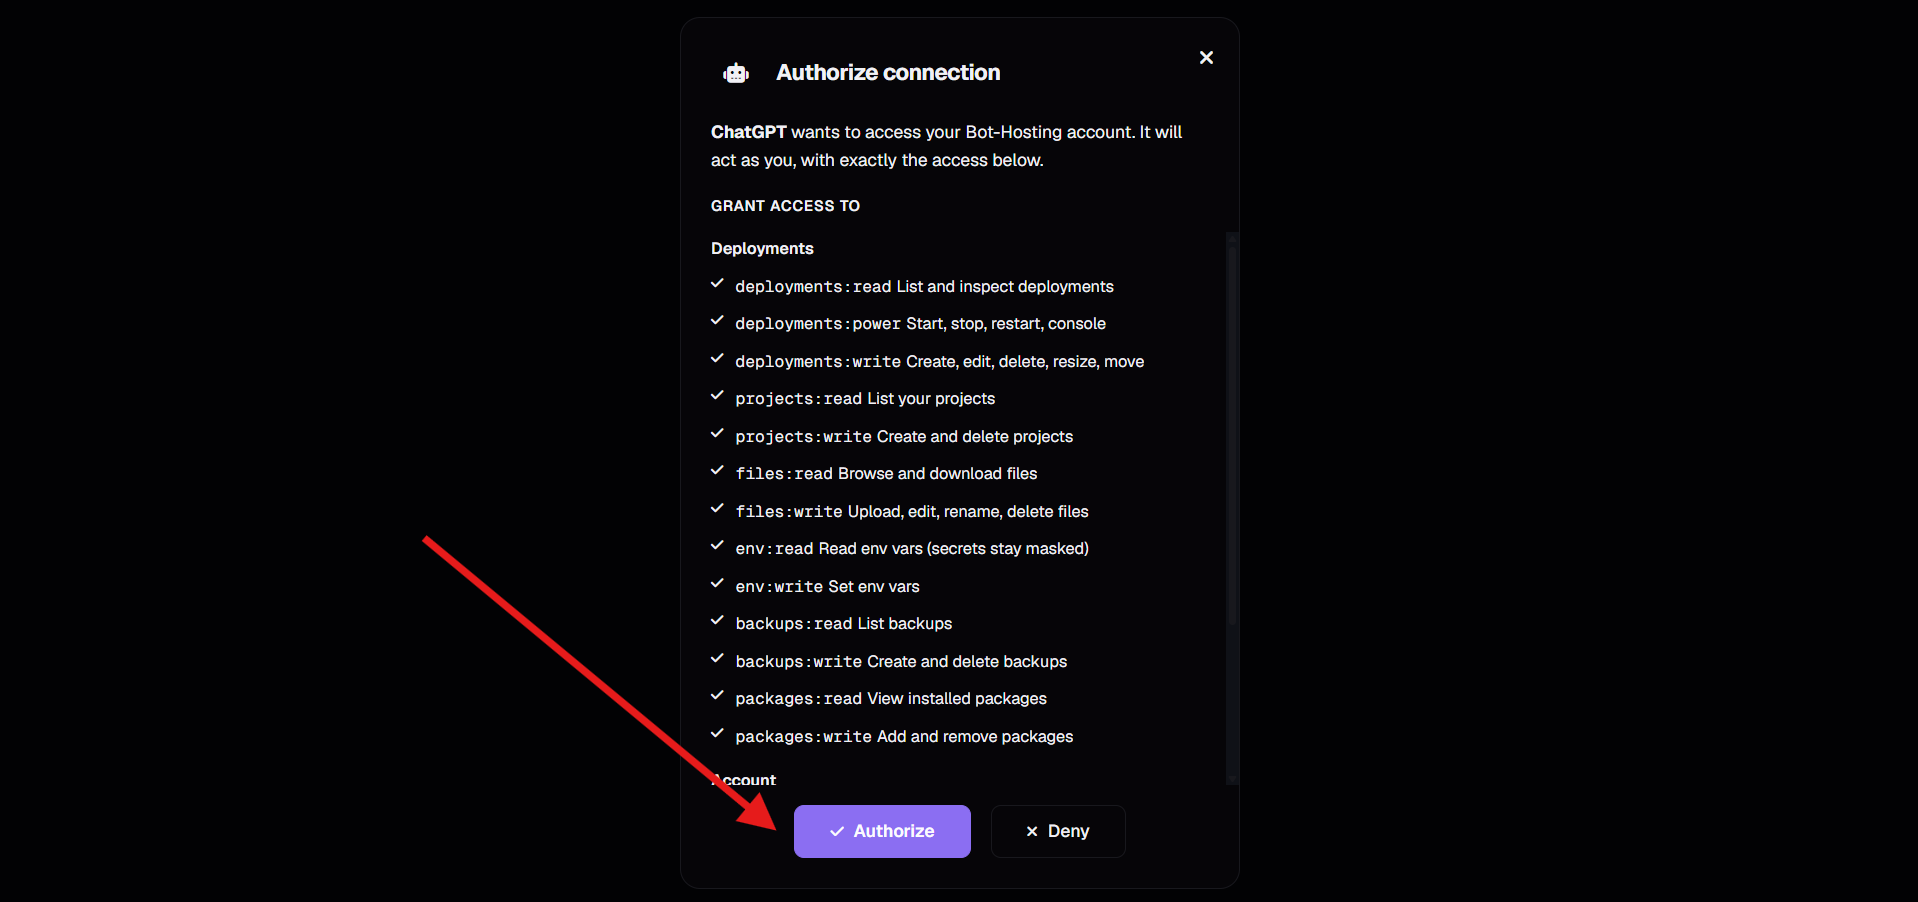
A few things worth knowing about this consent screen:
- The app declares the scopes it needs in the URL, and you approve the whole set. You cannot silently be granted more than what is displayed.
env:readlets the assistant list your environment variables, but secret values stay masked, scope or no scope.- You can review and revoke the connection at any time from your developer settings. Revoking is instant and kills the refresh token.
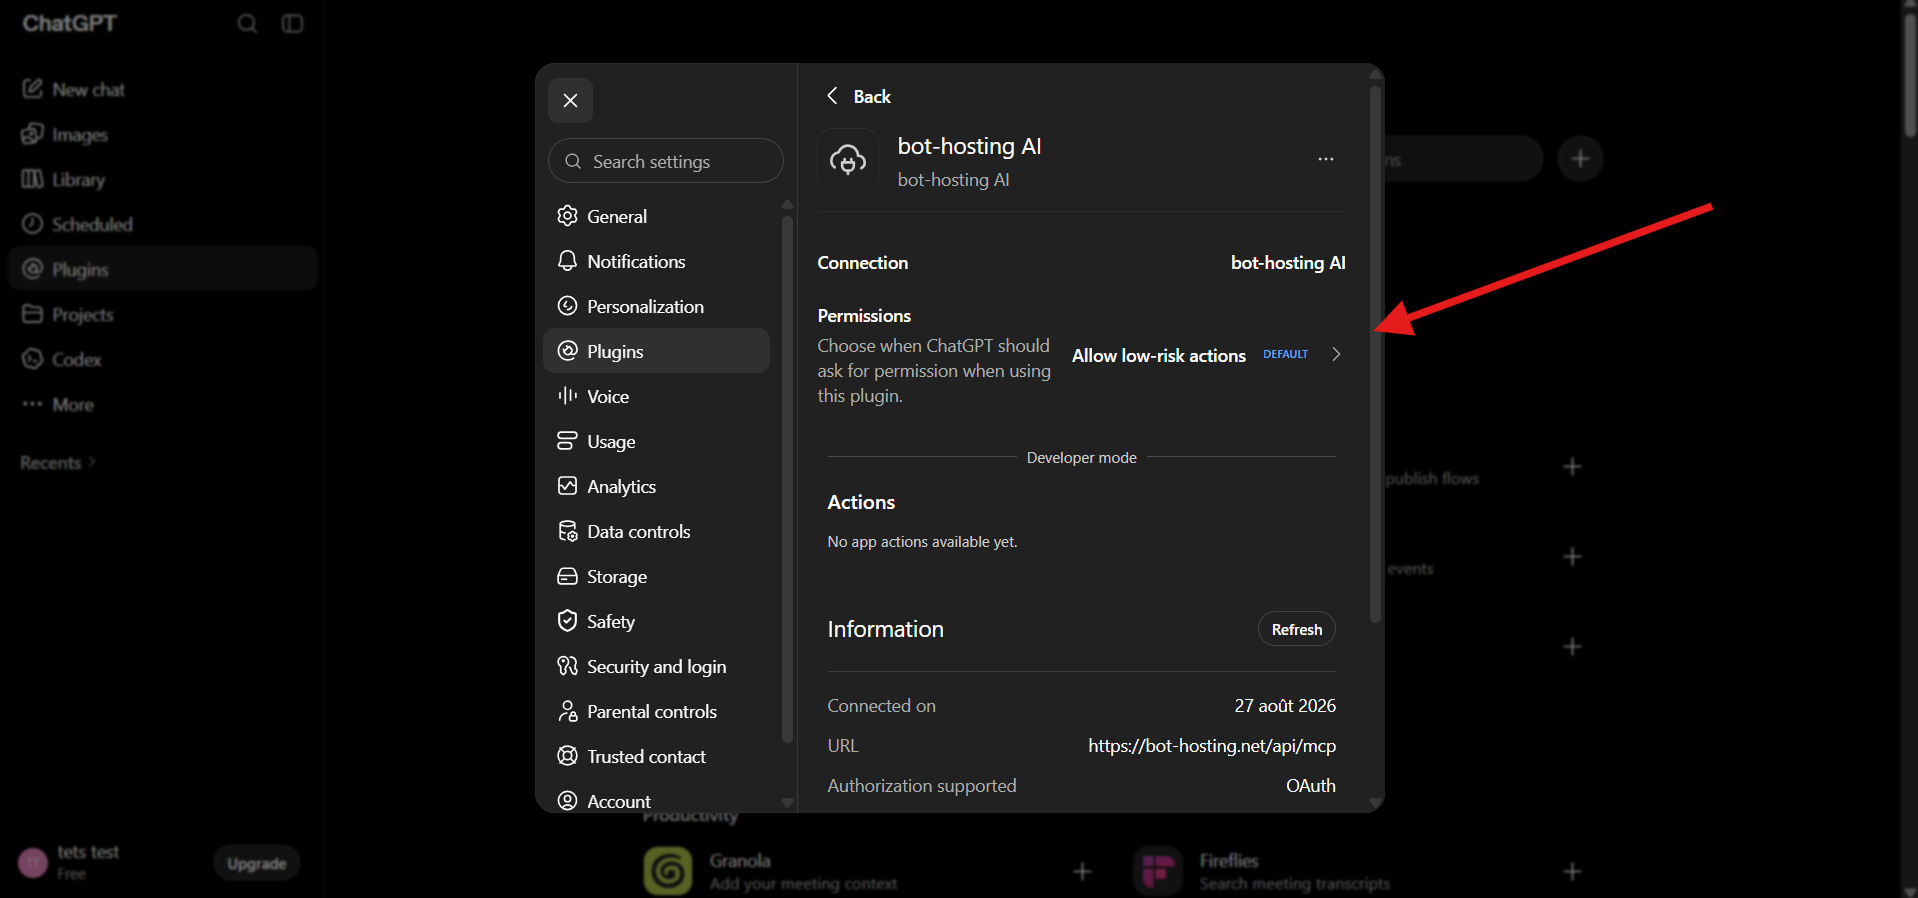
Step 8: you are connected
Back in ChatGPT, the plugin page now shows the connection, the endpoint, the connection date and the authorization method.
Step 9: choose how much autonomy to give it
Click Permissions on the plugin page. ChatGPT offers four levels:
| Mode | Behaviour | Good for |
|---|---|---|
| Always ask | Confirms before reading anything or making changes | Maximum control |
| Allow read actions | Reads freely, asks before changing anything | Debugging and monitoring |
| Allow low-risk actions (default) | Auto-approves low-risk calls, asks for sensitive ones | Most people |
| Allow all actions | Never asks | Trusted, hands-off automation |
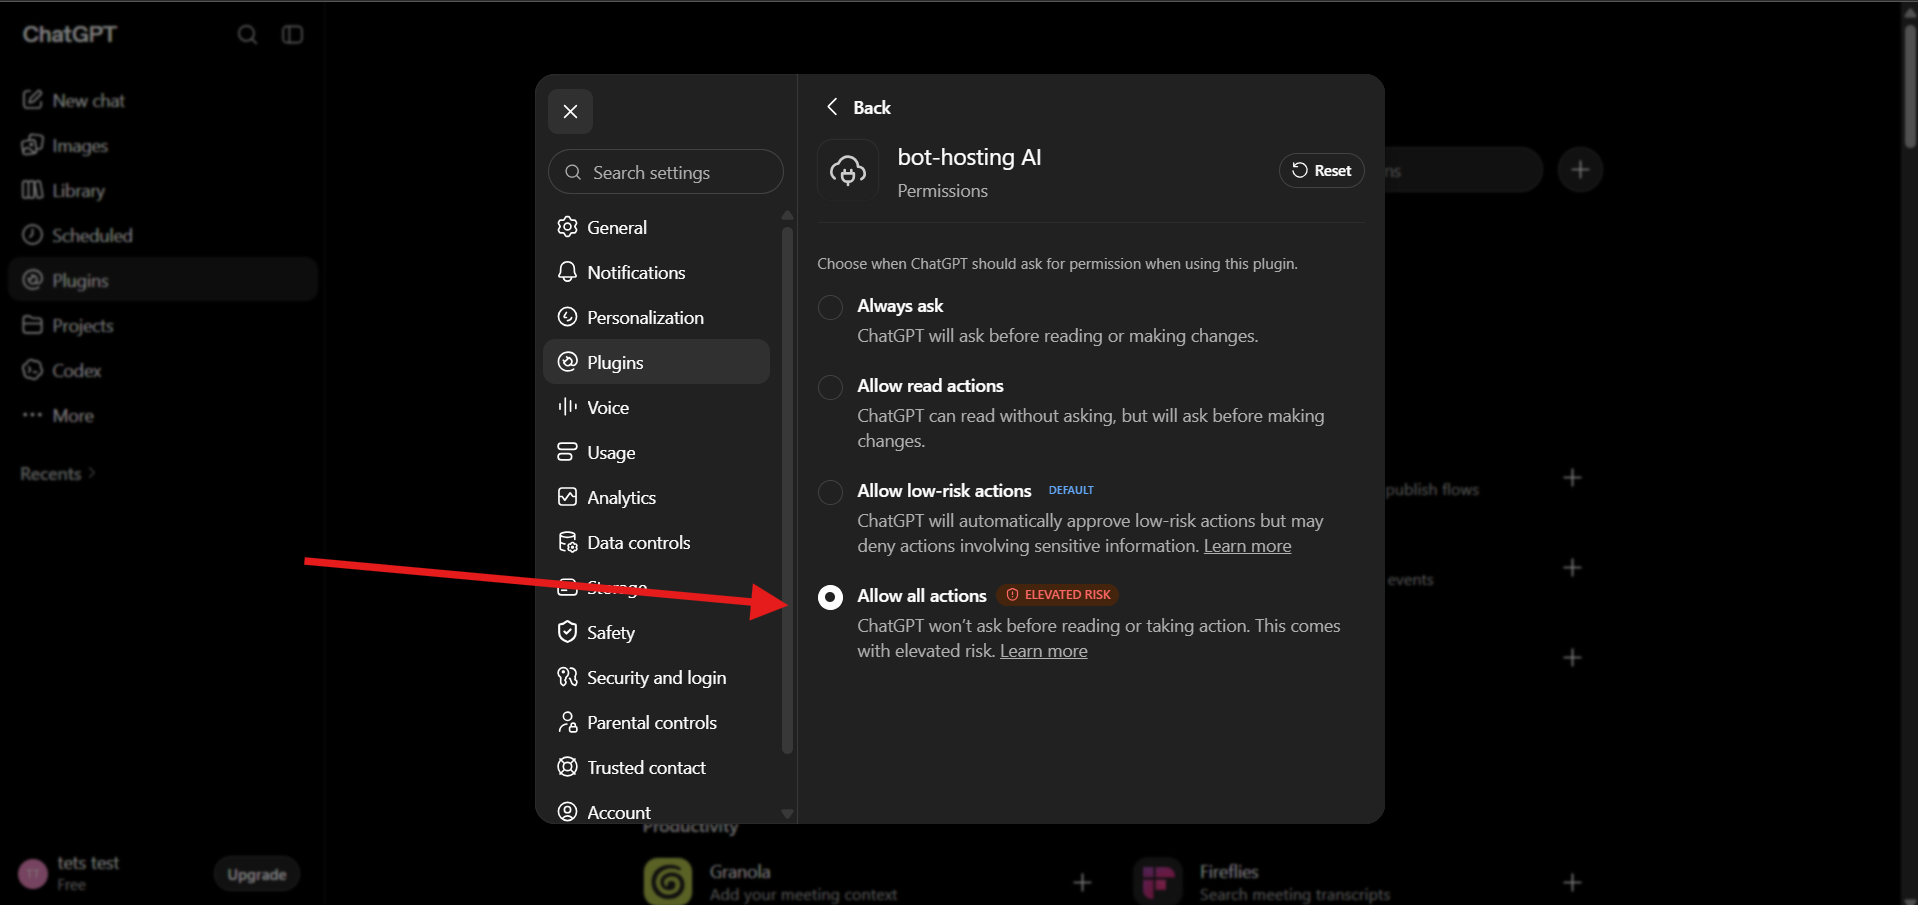
Our recommendation: stay on “Allow read actions” or the default “Allow low-risk actions” for the first few days. Once you have seen the kind of tool calls the assistant makes, you can loosen it. “Allow all actions” means a misread instruction can restart or delete something without a confirmation step.
Step 10: test it
Open a new chat and ask something concrete about your account. For example:
Are you connected to my bot-hosting MCP? Can you tell me everything about the “test-site” deployment?
ChatGPT calls deployments_list, then deployments_get, and comes back with the real values: ID, owner, status, state, runtime, RAM, disk, the works.
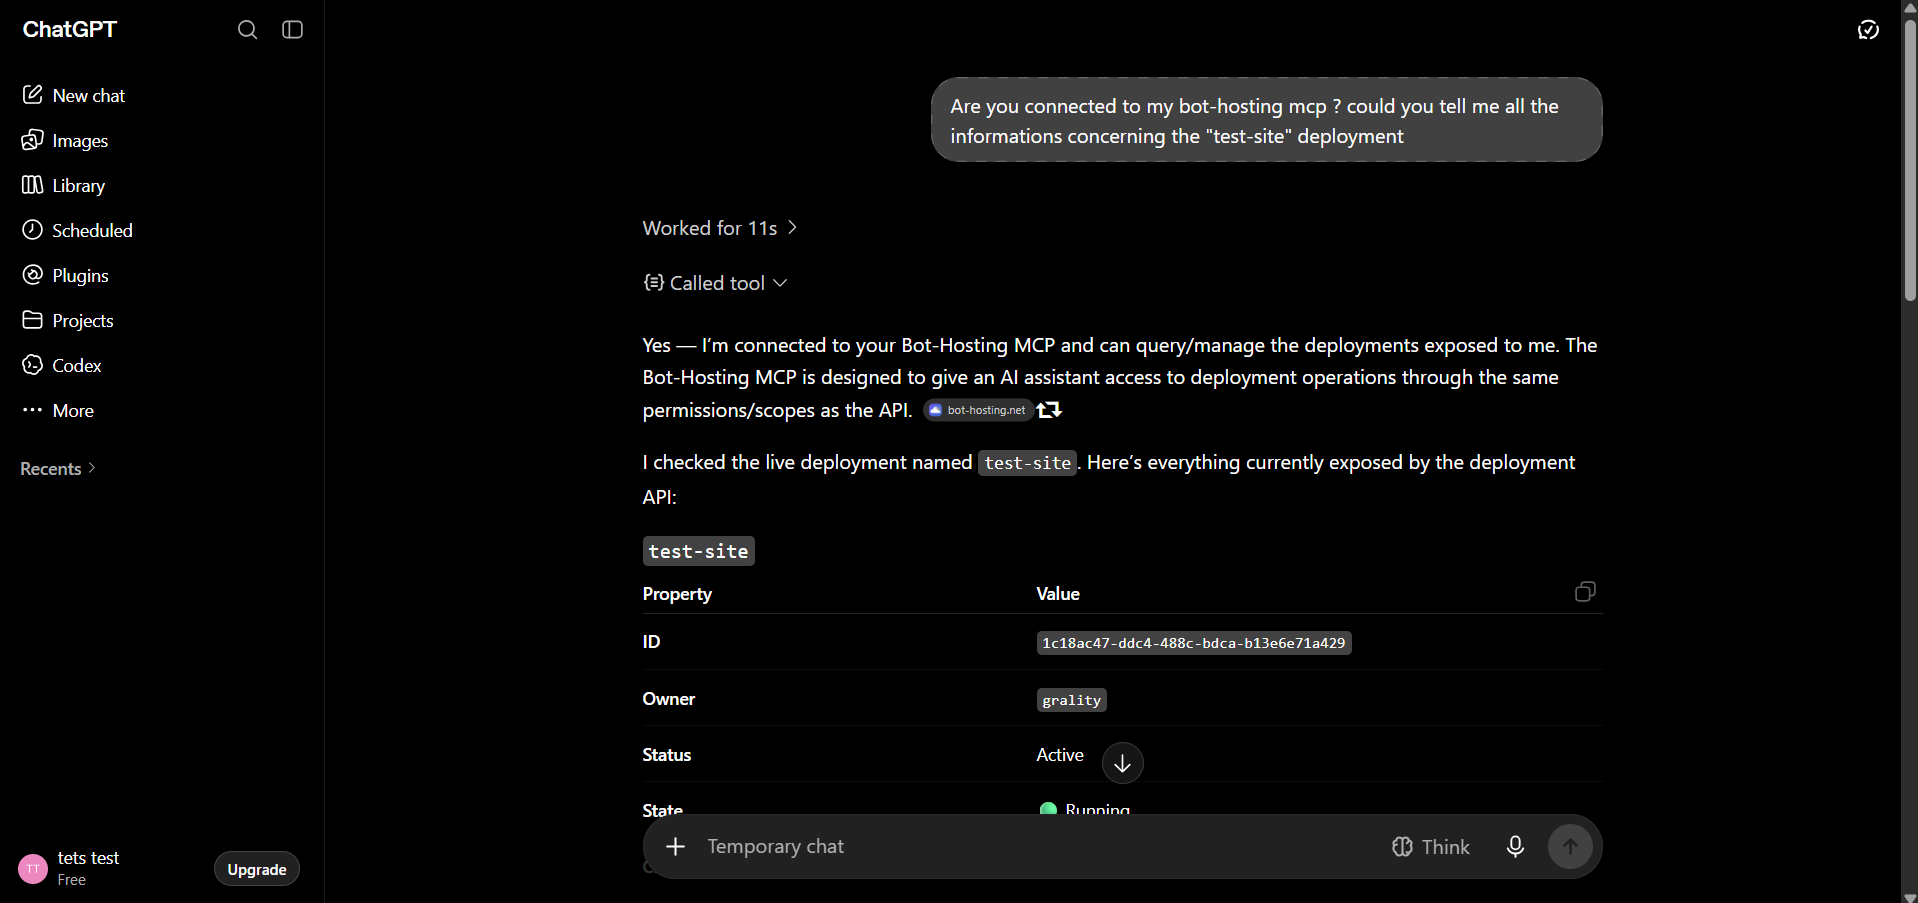
If you get live data back, you are done.
Security: give the AI the least privilege that works
An MCP connection acts as you. Treat it like any other credential.
- Scope it down. A support assistant that should be able to restart a bot but never delete one needs
deployments:readplusdeployments:power, and nothing else. If you connect a client with an API key instead of OAuth, you pick the scopes at creation time. - Never hand an assistant a full-access key you also use elsewhere. Make a dedicated one so you can revoke it without breaking anything.
- Watch for prompt injection. If the assistant reads a log file or a config file that contains attacker-controlled text, that text is now in its context. This is exactly why the read-only and low-risk permission modes exist.
- Revoke when you are done testing. Connections are listed in your developer settings and removing one takes a click.
Troubleshooting
“Could not connect to the server” Check the URL is exactly https://bot-hosting.net/api/mcp, with no trailing slash and no /v1. Also make sure Server URL is selected rather than Tunnel.
The OAuth window opens and immediately closes A popup blocker or a third-party-cookie blocker is usually the cause. Try again in a normal window, not a private one.
The tools appear but every call fails with a permission error The credential is missing the scope for that operation. For an OAuth connection, remove the plugin and re-add it so the consent screen runs again. For an API key, edit its scopes in your developer settings.
ChatGPT says it has no tools available The plugin exists but is not enabled for that conversation. Open the + menu in the composer and make sure the plugin is toggled on, then ask again. If the tool list is genuinely empty, hit Refresh on the plugin page in settings to re-fetch the catalogue.
It keeps asking for confirmation on every single call The permission mode is set to Always ask. Move it to Allow read actions or the default Allow low-risk actions.
Frequently asked questions
Is the Bot-Hosting MCP server free? Yes. It is included with every account, free plans included. What it can do is bounded by your plan’s quota, not by an extra fee.
Does the AI see my secret environment variables? No. Secret values are masked in the API response regardless of the scopes granted, so the assistant sees the variable names, not the secrets.
Can I use it with a free ChatGPT account? Yes. Every screenshot in this guide was taken on a free ChatGPT account, including the working tool call at the end. OpenAI does move features between plans, so if the Plugins section is missing for you, that is on their side, not ours.
Is it stable? The MCP server is in public beta. The tool set and response shapes may still change, and every call acts on your real deployments. Start with a read-only or scoped credential.
How do I disconnect it? Remove the plugin in ChatGPT, and revoke the connection in your Bot-Hosting developer settings. Revocation takes effect immediately.
If you would rather not use an assistant
The same operations are available directly. The MCP server page documents every tool, its input fields and its response shape, and the REST API exposes that exact same operation registry over plain HTTP. Both are generated from a single source, so they can never drift apart.
And if you are building an app that connects on behalf of other users rather than just yourself, look at OAuth for third-party apps: same scopes, same guard, proper per-user consent.
Now go ask your assistant why your bot crashed.